Master the Perfect ID Photo
Your photo is the single most critical factor for ID authenticity. Follow this comprehensive guide to create a studio-quality photo that passes all verification checks.
Photo Requirements Summary
Critical specifications for ID photos that pass manual review on the first submission.
People Also Ask About ID Photos
Camera & Equipment
You don't need a professional studio. A modern smartphone is capable of capturing the high-definition detail required for premium IDs.
Smartphone Requirements
-
Rear Camera Only: Never use the selfie camera. It distorts facial features (fisheye effect) and has lower resolution.
-
No Digital Zoom: Zooming reduces quality. Move physically closer instead.
-
Clean the Lens: A smudge can ruin focus. Wipe it with a microfiber cloth.
-
HDR Mode: Enable HDR to balance lighting and shadows automatically.
Forbidden Equipment
-
Webcams: Too grainy and low resolution for professional IDs.
-
Scanned Photos: Scanning a physical photo creates Moiré patterns that look fake.
-
Filters/Edits: Do not retouch, smooth skin, or apply Instagram filters. Our team handles professional retouching.
Perfect Background
The background must be seamless and clean to allow for precise cropping and replacement.
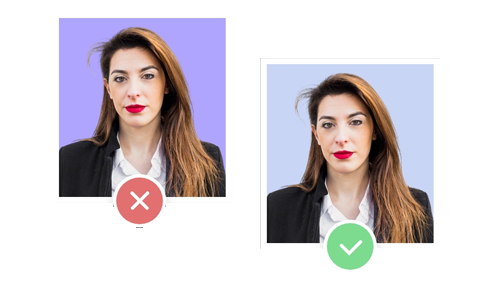
Plain White/Grey Wall
Smooth texture, even lighting, no objects in frame

Cluttered or Textured
Brick walls, curtains, or visible furniture make editing impossible
Shadow Elimination Secret
Stand 3 to 4 feet away from the wall. This distance acts as a buffer, ensuring your shadow falls on the floor behind you rather than on the wall visible in the photo.
Professional Lighting
Lighting makes the difference between a real ID and a fake one. Shadows are the enemy.
Natural Light is King
The best source is a large window on a sunny day (but not direct harsh sun).
Face the Window
The light should hit your face directly. Do not have the window behind you (backlight) or to the side (half-shadow).
The "Flash Warning"
Never use the built-in camera flash. It creates:
- Red-eye effect
- Oily/shiny skin spots
- Harsh black shadows behind your ears
- Unnatural skin tones that fail verification
Expression & Clothing
Your appearance must match official ID standards for biometric verification.
Neutral Face
Mouth closed, eyes open. Look straight at the lens. No smiling, no frowning. This is a biometric requirement for all official IDs.
Glasses Off
We highly recommend removing glasses to avoid glare. If you must wear them, frames cannot cover eyes and NO tinted lenses.
Contrast Clothing
Wear dark colors (Navy, Black, Grey). Do not wear white or light beige as it blends into the background.
Photo Submission Statistics
Continue Learning
Final Quality Check
Review this checklist before submitting your photo to ensure maximum success rate.